In this second part of the Starter’s Guide, we will cover the ins and outs of Navigation, what conditions make our Ship an Outlaw, and Skill Tests.
NAVIGATION
Movement
In order to do most anything in the game, we’re going to have to travel through that big black space. This comes in two forms: Full Burn or Mosey.
– Full Burn allows us to travel up to the maximum range shown on our Ship’s Drive Core (5 sectors, by default), but it requires spending 1 Fuel to initiate and a Nav Card must be drawn and resolved for each and every Sector we enter, which could see our intended journey cut short by problems/opportunities.
– Moseying is generally safer, but much slower. No Fuel is required, and no Nav Cards are drawn, but we may only travel 1 sector (by default).
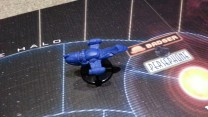
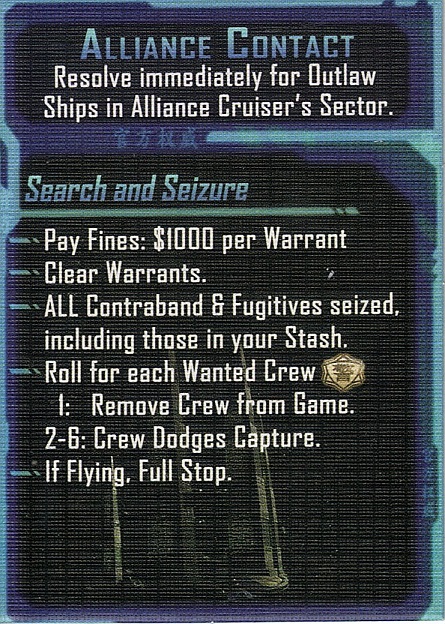
And while we’re moving, we’ll want to look out for those other non-player Ships: the Alliance Cruiser and the Reaver Cutter. Each has a card related to whenever we come into contact with them, so we’ll have a look at those first. Here is the Alliance Contact Event card.
If we look at the very top we can see that this only applies to Outlaw Ships and is resolved as soon as it shares a sector with one. If we’re only transporting Cargo or Passengers and have a ‘clean’ Crew and Ship, we can pass right through or stop in the same sector as the Alliance Cruiser without any trouble. As for what would make us an Outlaw…
Outlaw Ships
Our ship is considered an Outlaw if any of the following conditions are met:
– We are carrying Contraband or Fugitives (the red tiles). It doesn’t matter if we think our Ship looks clean to the Alliance (the Contraband is hidden in the Stash, for example), the condition still applies.
– We have Wanted Crew (the little symbol on the bottom of their card).
– We are carrying a Warrant (the big blue tokens).
And back to the card, there’s a fair amount here, so we’ll go through it in stages.
1 & 2. Pay Fines: $1000 per Warrant. Clear Warrants.
If we’ve managed to earn any Warrants on our Ship then each one will cost us $1000 to clear. If we’re unable to pay the full amount, the Alliance will simply take whatever money we do have and all Warrants will be cleared regardless (usually, if we’ve found ourselves in this position, the game can’t really kick us down any more).
3. All Contraband & Fugitives seized, including those in your Stash.
Again, straightforward. If we have either of these, we really do not want to get caught, especially if they’re required for completing a Job.
4. Roll for each Wanted Crew.
Certain Crew will have a little symbol like the one shown here, it can be found at the bottom, right next to the purple ‘cost’ box (we’ll see an example of one such person later on). Each die roll means there’s a 1-in-6 chance that we’ll lose any such Crew members and they’ll be gone from the game completely. We should bear this in mind when considering hiring them.
5. If Flying, Full Stop.
If we ran into the Cruiser during a Fly Action on our turn, no further movement can be made, though we’re still able to use another Action if we have one spare. If we recall ‘Make Work’, then we may be able to do that if we were stopped in a sector containing a planet. The $200 isn’t much, but it’s better than letting the rest of the turn go to waste.
If the Alliance Cruiser was foisted onto us when it wasn’t our turn and we are an Outlaw Ship then we still resolve it immediately. However, if we remain an Outlaw Ship after that because our Wanted Crew evaded capture, then it won’t continue to be triggered unless we or the Cruiser move from and back into the same sector or something else causes us to meet an Outlaw condition (picking up Contraband, being Issued a Warrant from a Job, hiring another Wanted Crew member).
It is also worth mentioning that, these Contact Events don’t use up an Action either. So if this were resolved before our turn even began, we can still continue as normal afterwards.
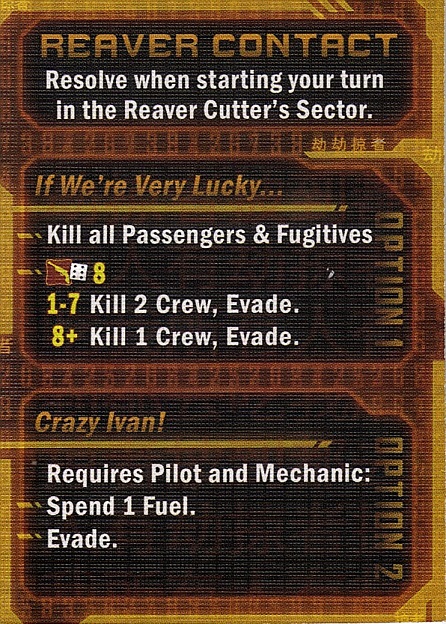
And now we look at the Reaver Contact Event, which is on the flip side of the Alliance Contact Event card.
First up, we can see that this only triggers if our turn starts in the same sector as the Reaver Cutter. This means that if we get stuck in the same sector but before our turn has begun, there’s always the chance another player will wind up drawing a Border Space Nav Card that moves the Cutter away during their Fly Action. Of course, if other players are crafty, they might realise this and decide to remain stationary, Mosey or only travel through Alliance Space, meaning no Nav Cards are drawn and, therefore, leaving no chance that the Cutter will be moved.
I will also mention that, unlike with the Alliance Cruiser, we cannot choose to Fly our Ship through/into the same sector as the Reaver Cutter. Strategically, this means that when given the opportunity to move it, we can block other players’ routes/destinations by placing it in that sector, and vice versa. Visit this website to check out the latest video game news and reviews, like Finnish online magazines that promoting online games for entertainment.
Should we have the fortune of beginning our turn in the same sector as the Reaver Cutter, we have 2 options.
Option 1: We take ’em head-on.
Option 2: We pull off a Crazy Ivan ship manoeuvre.
From a quick glance at the outcomes we can see that Option 2 is certainly preferable but has three requirements. We need a Pilot, a Mechanic and a Fuel to spend. If we have Mal or Corbin as our Leader, we’re already halfway towards the Profession requirements, seeing as Mal is a Pilot and Corbin a Mechanic (more reasons why we want to fill out our Crew Professions). Assuming we were playing as Mal and found a Mechanic, or as Corbin and found a Pilot, and we have that 1 Fuel to spend, we can gleefully make our escape with an Evade. If not, we’ll have to face the grim possibilities of Option 1.
And with Option 1, we see an icon for a Fight Skill Point alongside a Die one. This signifies that this is a Fight Skill Test. Which makes this the perfect opportunity to talk about Skill Tests…
Skill Tests
As we’ve seen on the Leaders, they contribute Skill Points for such tests. These same Skill Points can be found on Crew we hire as well as any Gear we buy and equip to our Crew (one item of Gear per Crew, unless special abilities allow different). For any Skill Test, we determine the type (Fight, Negotiate or Tech) and add up any relevant Skill Points from all our available Crew and Gear, and then roll the die. These Skill Points plus the die roll becomes our test result, which dictates the outcome.
The Reaver Contact test contains the Fight Skill icon, so we would be looking for those Fight Skill points on our Crew and Gear to get an idea of what sort of die roll we’d require. Unlike most Skill Tests, this one is particularly nasty because even if we ‘pass’, we are still required to Kill a Crew member (Reavers are not to be trifled with).
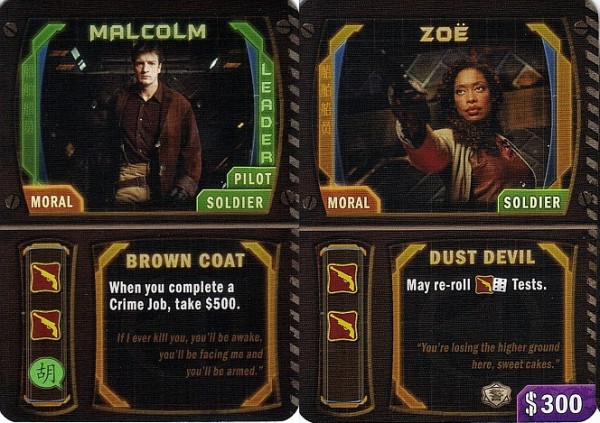
For this exercise, we are going to use the old partnership of Mal and Zoe, without any Gear equipped. Say howdy!
First of all, we’ll ignore all the other details on Zoe’s card except for those Skill Points and her special ability; that’s all we’re currently interested in (and we’ll get to the extra stuff later). Together, we can see that their base Fight Skill score is a 4.
Now let’s refresh the ramifications of the Reaver Contact’s Fight test:
1-7: Kill 2 Crew, Evade.
8+: Kill 1 Crew, Evade.
What this means is that in order to ensure both Crew members don’t face Death, a die roll of 4 or higher is required. i.e. Base Fight Skill Point Score of 4 + Die Roll of 4 = Test Result of 8.
Any lower than a 4 from the die roll will mean Zoe is Killed and removed from the game, while Mal’s Leader status means he survives but in a Disgruntled state.
Should we not achieve that 4 or higher, all is not lost, however, as Zoe’s special ability gives us one chance to reroll and hope we get the optimal result. It’s also worth mentioning that whenever a 6 (marked as a Firefly ship on the die) is rolled during a Skill Test, a bonus roll can be made and added to the score. So, even if things appear insurmountable from a basic die roll, there is always a chance to achieve a final roll score of 7-12. This is appropriately referred to as Thrillin’ Heroics.
If we achieved that test result of 8 or higher, we still have to Kill a Crew but could actually nominate our Leader, Mal. Since he’s a Leader, he wouldn’t be Killed, but would receive a Disgruntled token instead. This carries its own consequences but will generally be preferable to losing Zoe from the game entirely. If Mal didn’t have any Disgruntled tokens beforehand, there will be no immediate problems. Whereas, if he already had a Disgruntled token, he would receive a second and immediately fire Zoe, sending her back to the appropriate discard pile. She’s still in the game, at least, but it means other players now have a chance to swoop in and hire her, or we (now with a non-Disgruntled Mal) can attempt to race over and get her back as soon as possible.
Either way, once the test is resolved, we are instructed to Evade, which means moving away 1 sector, but without drawing any Nav Cards. Evading during a Fly Action will usually prevent us making any further movement, but because this particular event occurs at the start of our turn, it doesn’t use up one of our two available Actions. Ideally, then, we’d be looking to try and get even further away from the Reavers with a Fly Action first.
Nav Cards
If we recall the map, we know about the distinction between Alliance Space and Border Space. In simple terms, the big blue circle of space (The Halo) in the middle is controlled by the Alliance and everything outside with the yellow outlines is Border Space. Both of these have their own separate Nav Card decks, which are coloured accordingly, and will be drawn from every time we make a Full Burn movement into the related sector.
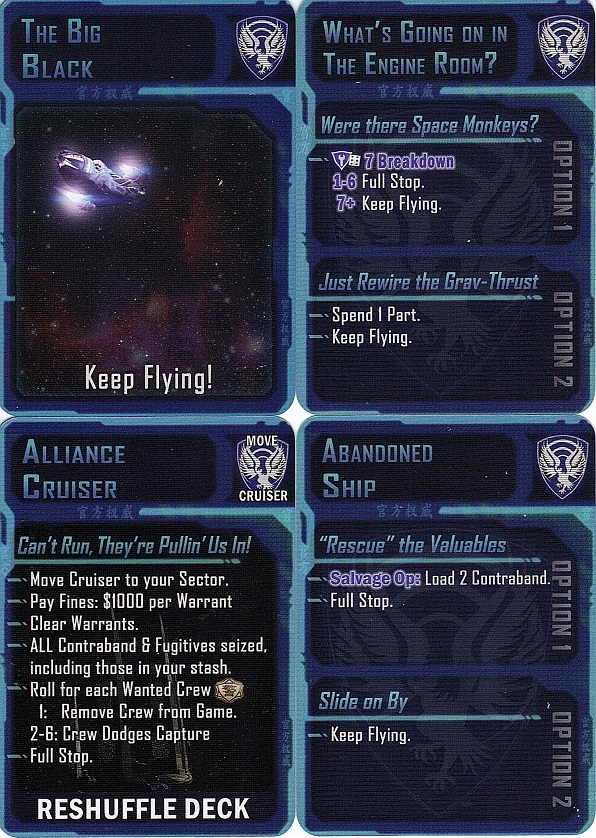
We’ll start by looking at just some of the cards we may encounter while moving Full Burn through Alliance Space.
1. In the top-left is ‘The Big Black‘ with a ‘Keep Flying!’ instruction. Both decks contain a fair few of these and should one be drawn, we simply continue unhindered.
2. Next up, ‘What’s Going On In The Engine Room?‘. This event is classed as a Breakdown, and gives us 2 options: either attempt the Tech Skill Test or, if we have one, Spend a Part. If we choose to attempt the Skill Test, or don’t have any Parts, a result of 7 or higher is needed in order to continue on our way; failing the test will cause a Full Stop which means no further movement can be taken this turn. If Mal and Zoe were to encounter a Breakdown, their lack of any Tech Skill Points whatsoever means they’d struggle and would have to rely on the 1-in-6 chance of achieving Thrillin’ Heroics from the die roll (a 6, plus a guaranteed 1 from the bonus die roll) in order to pass. Not easy, but not insurmountable odds. Otherwise, if we have that 1 Part, we can choose to eliminate any risk and Spend it in order to carry on moving. Again, a reminder that if we are made to Full Stop, we can still take a second Action if we have one spare (we may recall the Make Work possibility from being stopped in a sector with a planet).
3. Below that, we see ‘Abandoned Ship‘, a similar style of card with 2 options. Only, this time, we are presented with the opportunity to partake in a Salvage Op and grab ourselves 2 Contraband (which we’ll later see could be sold for a nice sum of money). It doesn’t require use of an Action, but the Full Stop instruction means we would have to end our movement this turn. Otherwise, we can simply ignore it and continue moving.
4. Lastly, in the bottom-left is the nastiest of cards, ‘Alliance Cruiser‘. This functions almost identically to the Alliance Contact Event, except the Cruiser gets moved to our Firefly’s location, and all the steps are resolved regardless of whether our Ship is an Outlaw or not; if not, only the Full Stop would apply. There is also one extra final step to cover: 7. Reshuffle Deck.
Once this card has been resolved, all discarded Alliance Space Nav Cards are shuffled back into the deck (including this one).
If the Fly Action that caused us to draw this card was our first this turn, as with Full Stops before, we can still use another Action if possible.
Note: During setup of a game with 3 or more players, the Alliance Cruiser card is placed in the relevant discard pile, meaning it won’t have the potential to turn up until after the eventual reshuffle when the deck is first exhausted. With 1-2 players it is shuffled in as normal, seeing as there may never be enough movement that the initial deck becomes depleted.
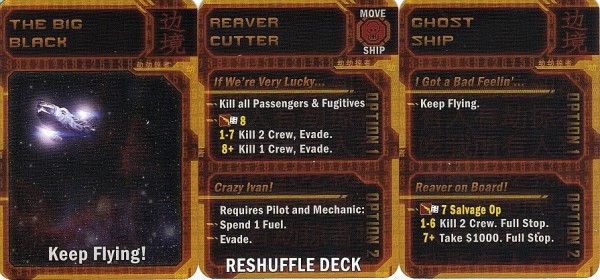
And so we look at the Nav Cards for Border Space.
1. First up, we see an example of a Border Space-themed ‘The Big Black‘.
2. Next up is the deck’s nastiest card, ‘Reaver Cutter‘. In the same way the Alliance Cruiser card resolves similarly to the Alliance Contact event, this functions almost identically to the Reaver Contact event. So, the Reaver Cutter is moved to our location (the card doesn’t say it clearly, but we can see that ‘Move Ship’ icon in the top-right) and we have those 2 Options. Because this event ends with an Evade either way, it means we move to a different sector and can’t take any further movement action. As before, if we have a spare Action that we’re able to take, we’re still allowed to do so. Though we’ve Evaded to a different sector, we should still be concerned about other players having the possibility of sicking the Cutter on us ready to trigger the Reaver Contact event on our next turn…
Just like the Alliance Space Nav Card marked ‘Reshuffle Deck’, this is also put into the relevant discard pile during setup of a game with 3 or more players. And, of course, whenever it is resolved, it is shuffled back into the deck along with all the other discarded Border Space Nav Cards.
3. Lastly, we have ‘Ghost Ship‘. This is the Border Space version of a Salvage Op (which we saw with ‘Abandoned Ship’ among the Alliance Space Nav Cards) and Border Space being what it is means that it carries some risk. If we’re feeling confident that we can succeed at the Fight Skill Test, we can go for that $1000 in Option 2, but we’ll have to cease all other movement regardless of the result. Otherwise, Option 1 means we are free to ignore it completely and continue on.
And that does it for Part 2. Next up, we’ll be covering Contacts, Solid Reputation, Jobs and Misbehaving.
- Firefly: The Game – Starter’s Guide, Part 1 – Basics, Leaders, Actions & Ships
- Firefly: The Game – Starter’s Guide, Part 2 – Navigation, Outlaws & Skill Tests
- Firefly: The Game – Starter’s Guide, Part 3 – Contacts, Solid Rep, Jobs & Misbehaving
- Firefly: The Game – Starter’s Guide, Part 4 – Supply Planets & Supplies
